Max Payne :: Making a basic room
File: /articles/basicroom.phpUpdated: 29.08.2001 - 10:24 - @392
click here for a printable version
Version: 1.0
Content:
- Introduction
- Setting up the editor
- Building Your First Mesh
- Tinkering With Your Mesh
- Adding a Room and Doorway
- Joining Meshes
- Texturing
- The Exit
- Entities
- Compiling and Playing
1. Introduction
Editing can be difficult at times, but you just got to stick with it and trying not to get burnt out on creating levels. The MaxEd builder seems extremely hairy at first glance (True, I thought initially it was the Yeti --mixuk), but now that I've used it and know that I understand some of the finer points such as exits. It is almost becoming intuitive. I think that with a couple of days on it under your belt, along with some more tutorials, the Max Payne modding community will be going full force.
2. Setting Up the Editor
Now to get yourself ready to edit. First, open the 'Materials' menu, and choose"Insert
materials from file...". Find the 'BasicRoom', which is by default
in 'MaxEd/Examples/'. Now you have textures. But what good are they
without a room? That's the next step.
3. Building Your First Mesh
Okay, in MaxEd, there are different modes that define what type of stuff you can do. For a good reference of each, check the MaxEd reference guide in the help folder. Choose the model mode (F3). Now on the grid, find one of the larger squares, in light blue instead of dark blue.To make a mesh (which is basically the same thing as a brush to those who have previous editing experience), click on one of the corners of the big, light blue square. There is now a line connecting the place you clicked to your cursor. Continue to click around the light blue square's corners until you have clicked all 4. Now right click to accept the shape.
Congratulations, you've just built a mesh.
4. Tinkering With Your Mesh

You should have noticed that the mesh seems a bit flat. Well, we can fix that by using the 'Extrude' mode (F4). Now position the cursor over your mesh so that the edges of the ceiling are highlighted. Now click and hold the left mouse button, and raise the roof to make the mesh look as cube-like as possible. Release the mouse button, and now your mesh is ready to go in a level, but first, the editor requires that a certain thing called an 'exit' be created. Exits are tricky, but they become a bit easier when you're used to them.
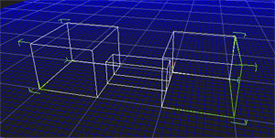
5. Adding a Room and Doorway
Before we can make our exit, though, we need to have a reason to have an exit. In this case, we're going to make a second mesh, and a hallway mesh connecting it to our original mesh. Since we already know how to make a mesh from scratch, let's try copying one instead of building a whole new one. Goto 'Transform' Mode (F5), and then left click on your cube mesh. This selects your mesh. Goto the edit menu and choose copy (or Ctrl-C), and then choose paste (Ctrl-V).You now have a second mesh, but it is in the same place as your first. Make sure you're in 'Transform' Mode (F5), and then left click and drag on your mesh, draggin the mesh left. (If you want accurate pasting, go F3 and point on the grid where you want the mesh and paste --mixuk)
You now have two meshes, ready to be connected. Go back to 'Model' Mode (F3), and build a third mesh between your two rooms. Make sure that the hallway mesh doesn't fall short. As long as you're using the grid, it shouldn't be much of a problem.
Goto 'Extrude' Mode (F4), and raise the ceiling of your hallway, but not quite as tall as the two rooms. Two more steps, and you'll be ready to create your first exit.
6. Joining Meshes
Now for your mesh to be counted as a true room by MaxEd and MP, it must have an exit. Before we can add the exit, we need to unify all our meshes into one, so when we do make an exit, it will mark both of our room meshes as true rooms.
If we don't join them, and place the exit in the hallway, the hallway will be split into two true rooms, but our room meshes will not be considered true rooms. This sounds confusing, but it is the best I can put it at the moment. Now to unify our meshes. Goto 'Transform' Mode (F5) and click on one of your room meshes. Either use the 'Mode Commands Menu' and then 'Booleans' and 'Union', or just press the 'u' key. Now click on your hallway. Choose okay, and one of your rooms is now fully attached to your hallway.
Check to make sure you're in 'Transform' Mode, (F5), and choose your other room mesh now. Press 'u', and then click on your room-hallway mesh. Choose okay, and you now have a single mesh made into a room-hallway-room shape. One more step for the exit.
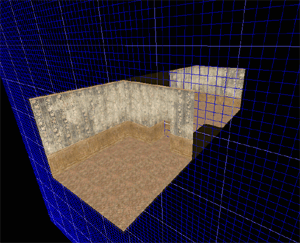
7. Texturing
Oddly, I've had to have my level textured before I could define exits, so this step comes before creating your exit. As long as you inserted the textures before you started building, you should be set. Just in case, goto 'Mode', and make sure Wireframe is toggled off (F2). Move around your level and make sure that all surfaces are textured. If you want to texture your level now, go on ahead. Choose a texture from the drop down menu on the left side of your screen, and (while in 'Texture' mode (F6)) left click on the walls/floors/ceilings you want to hold that texture. Right click and drag to pan the texture on the surface.
Now to make your exit.
8. The Exit
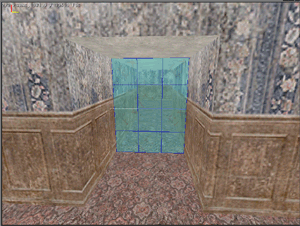
Exits are 2D planes that split up meshes into separate rooms according to MaxEd and MP. We want ours to be placed in the middle of the hallway, or at one of the ends of the hallway. Exits are restricted to where ever the grid is positioned when you make it, so we first need to prepare the grid so it is on the same plane that we want our exit on.
Goto 'Move Grid' Mode (F12). Using the '1', '2', and '3' keys, make it so the grid is cutting cross-sections of your mesh the short way. Then use 'Page up' and 'Page down' until the grid is positioned halfway through your hallway. If your hallway is too short to get the grid in the middle of it, just position it so it is at the end of the hallway.
(It's perhaps easier when you just go into F4-mode and point the wall where the hallway is, and then just press A, then the grid will align itself with the wall. Then just go to grid-mode (F12) and press pageup/pagedown to move the grid into position --mixuk)
Now position your camera so you can see straight down the hallway, and you can see all four edges that you'll need to make your exit. Goto 'Exit Creation' Mode (F7), and I find it is easier to do with wireframe off (F2). The grid should be in front of you, so now just click on the four corners of the grid that mark the hallway (it could also be seen as clicking the four edges of the hallway that touch the grid). Make sure you only click the four, and that you go in order (CCW, CW, doesn't matter). Now right click, and you'll get a message, "Mesh is separated into two by exits."
Voila, your first exit. There's still more before you can compile your level, though.
9. Entities
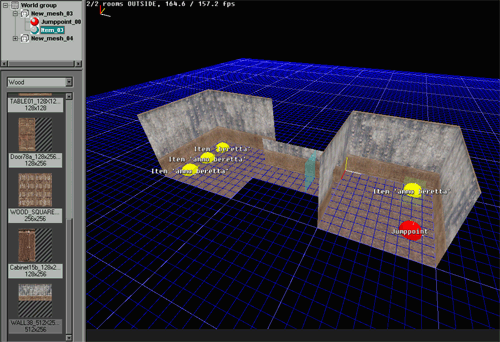
First we need to reset the grid, so in 'Move Grid' mode (F12), press 'r'. We need to place some entities in order to let the editor know where Max will start, as well as fun stuff to fiddle with like guns. To make an entity, goto 'Model' Mode (F2). Now, move the cursor to where you want Max to start at, and press the 'n' key. In the menu that appears, choose 'Jumppoint' and click ok, then click ok again to set your jumppoint and its settings.
If you want to add guns and items, do the same, but instead of choosing 'Jumppoint', choose 'Level Item'. And then from the next dialogue, goto the Entity Tab and change the menu to whatever item you want. Place whatever you want, where ever you want. Now to group your entities to the rooms. Goto 'Transform' mode (F5) and click on one room (not an entity). Now press 'e' to automatically group all entities to that room. Do the same for your other room too. Then go in and texture your map properly (see section 7).
Now you're set to compile, and then play, your map.
10. Compiling and Playing
I'm going to gloss over this a bit, but here's the basics. First, in the File menu, choose 'Export X_LevelDB'. Then to archive it as a mpm, we need to first uncompile the basicexample mod (NOT map)to sorta steal the text files and directory setup. Once you uncompile it, (rasmaker -x "Basic Room Example Mod.mpm"), go into the levels.txt file, and edit the [Basic_Room] section to accomodate your level.Pay attention to these lines:
[basic_room]
LevelName = "Basic Room";
Level =
      basic_room.ldb;
PlayerStartingPlace =
      "::StartRoom::Jumppoint_00";
Obviously, you change all the values to more reflect what your level is, and basic_room.ldb must be the name of your level db. Make absolutely sure that your jumppoint is grouped in the mesh that you put between the colons. Also open the menu.txt file and pay attention to these lines:
name = "Load Basic Room level";
ToolTip = "Loads the example
      level installed by the Basic Room mod";
[Message] String =
      "maxpayne_gamemode->gm_init( basic_room );";
Thanks to xmod2 for pointing these out on VE's BB. The beginning tag in levels.txt "[basic_room]" needs to match the "gm_init( basic_room )" value. You can alter it, but just make sure they still match.
Now that you've editted those lines in the text files to fit your map, run rasmaker again (rasmaker -a data yourlevelname.mpm). Now move yourlevelname.mpm to the maxpayne directory and run MP. Before you press 'Play', choose your map under the 'Choose Customized Game' menu. Run it, and then load your map.
You just made your first MP level. Good luck with future ones.
I put a copy of the level I made along with this tutorial, which is located here.
--Carl Hapley aka SpazWad
slightly edited by mixuk If you want to comment this article, mail SpazWad