Max Payne :: Zen of MaxEd
File: /articles/zenofmaxed.phpUpdated: 28.08.2001 - 12:32 - @481
click here for a printable version
Version: 0.63
- MaxEd - the beauty or the beast?
- Rooms
- Manipulating the Mesh
- Animations
- Lights
- Finite State Machines(FSM) & Messaging
- Enemy control & AI -calculation
Foreword
When I started to work on maxpaynemods.net, I thought all tutorials are done. So maybe I can forget about writing one for MaxEd? No luck on that one, it turned out that I got about 4-5 questions everyday in the mail asking questions of MaxEd and I see constantly people asking for help in IRC.
The net is full of different tutorials which cover all these things. I think. The truth is that I haven't really read other tutorials. The only one i've read is the door-tutorial i've posted on the Tutorials-section. Rest is a result of continuous studying and talking with various people on IRC. So I really don't know if the other tutorials are any good.
Anyhow, I don't like to post urls of tutorials I haven't even read, so I decided to write my own. That way I know everything about it, and can perhaps enhance it later myself, and correct the errors. There is most certainly some errors in this tutorial, and I hope that people notify me about them (you can find my mail address at the bottom of this page).
Anyhow, back to the subject. I think the attitude should be "try it first yourself - ask then". Many people are running to ask help in the first little problem they have, they don't even try to solve it themselves, but relies on other peoples help. For instance on channel #maxedit, there are constantly people asking very basic stuff, which, i think, should be on all those tutorials out there.
Secretly I hope that this is The Tutorial which ends all other tutorials. So that when someone asks something, I just can say "hey, look at this url" and that's it.
The first part just goes thru some philosophical nonsense which you can skip if you are in a hurry. Above, is a linklist, choose there the part you want to learn.
You should also read the other article, where i explain how to make the level playable. You need that info at Part 7: Enemy Control & AI -calculation.
Here's some legend of what my words mean in this tutorial:
- RMB = Right Mouse Button
- LMB = Left Mouse Button
- MMB = Middle Mouse Button
- DO = Dynamic Object
This tutorial is still under heavy development. You can see in the menu what parts are done, i'll make the rest asap.
I'd like to thank Marvel & Skaven who patiently answered many questions, and also all those who have sent me mail and encouraged to work on with the site and tutorials.
--mixuk, 16.8.2001
MaxEd - the beauty or the beast?
For many, MaxEd look like a beast. One big ugly clump with fangs, and it bites when you try to go near. For other people it's the beauty. Not a literal beauty (unlike the ugly clump), but a beauty of technical supremacy. In truth (bet no one knew this) MaxEd is a very powerful tool. You can do it all in maxed. And I really mean ALL. If you take a look at Max Payne, you'll see, that most of the adventure is in "the game mode", you experience it, while you play it.The map designers of Remedy has done an outstanding job. They've brought a very realistic and detailed environment to the screen. And it all has been done with MaxEd, though for some of you, it might be hard to believe.
So, you have the tool which was used to create Max Payne. There are no limits. So, let's cut the crap and get into business.
But before that, here's my ten commandments of MaxEd:
- MaxEd is the LORD your God, you shall have no other gods before it
- Don't underestimate the power of lighting. With it, you can emphasize certain areas of your rooms, and more importantly, conceal other ones.
- Keep holy the exits. Use them wisely, but don't be afraid to apply an exit if needed.
- By MaxEds right side sits Photoshop (or his friend, paint shop pro)
- Use hours to rooms where people will only last for a couple of seconds. The truth in this is, that most people won't notice the abundance of detail, but they will notice the lack of it.
- You shall commit the Holy Save often, because sometimes your God, MaxEd, is a bit crashy
- Let the Holy Grid guide you through the valley of.. err.. vertexes. Use it everywhere.
- Thou shalt complete what thou hast started
- You shall not covet your neighbor's wife/husband or girl/boyfriend (without permission)
- You shall not either covet your neighbor's models or textures (without permission)
Part 2: Rooms
How they work?
Levels of Max Payne are consisted of "rooms". Now a "room" doesn't have to be literally a room, it can be a space which consists of a room, a hallway and maybe some windows etc. So in practice making "rooms" is just dividing the level into smaller sections. You have to also understand what a "mesh" is. Well it's simply an object which consists of several polygons (at least two), and if you don't know what a polygon is, then this stuff is too advanced for you. Basically, when you draw a room, it's a mesh. When you create a table in there, it's a mesh, etc, you get the picture.But now you may wonder why we need to do "rooms" to divide level in smaller pieces. Well it's simple, it helps the engine to draw stuff on the screen more easily. and in MaxEd, you need to have at least two rooms to make the level work.
I hear you cry in frustration "But oh, how do we do these "rooms" you speak of?" We need things called Exits. I'm sure you've heard of them, and they might sound like scary big horrendous things which screws everything up and is a bitch to do and so on. Well, all that is true.
Exits are 2d-planes which just simply is drawn vertically between the future "rooms" so that it divides them in two. But let's now forget exits for a while and make something. So warm up your maxed and start a new level. Yes, in the beginning there was a grid.
I'll tell you directly what to do, and also explain what you are doing and why. There are several modes in MaxEd, and they all have their uses and needs. I'll introduce them briefly:
F2 - Texture/wireframe -view toggle
F3 - The "drawing" mode, you use this mode in creating new rooms and objects, you'll be in this mode a lot
F4 - Extrude mode, in this mode you manipulate polygons and meshes. You can for instance make a mesh higher, or skew a polygon, more of this later
F5 - Move/Select -mode, in this mode you can move & rotate objects/meshes
F6 - Texture-mode, in this mode you do all your texturing
F7 - The dreaded Exit-mode, in this mode you do your exits
F12 - Grid-mode, in this mode you manage your grid. Many thinks that the grid is a static layer, but no, you can move it around, twist it, scale it all you want, very useful tool, you'll use it a lot.
Space - move-mode, in this mode you make your movements in the editor, just hit space when you want to move
Creating meshes
Basics
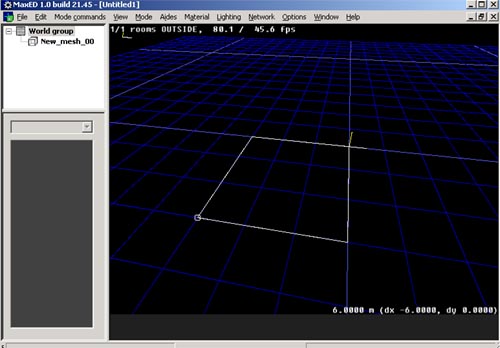
So, let's do a square-based room shall we? Press F3, now, you might notice that when you point at the editing screen in F3-mode the cursor "ticks" to grid. If you want to make a large room, you should press numpad+, then the grid's scale goes larger. It's easier to draw when the grid is large. You'll understand it when you do it.But now let's make the room. Just point'n'click the cursor everywhere where you want a vertex. You basically just first draw a square, and when you click RMB it connects the last and first vertex you've drawn and then creates a mesh of it. The height of the mesh is one minimum "tick" of the current grid. If you don't want to draw a mesh, but only a polygon, hold down shift, before the last RMB-click. You should also watch the lower right corner of your editing screen, because there you can see the length of the line you are currently drawing. It's nice to know all dimensions of the room.
Also, because of the 3rd person -mode in the game, you should generally make things large. A door should be like 1.5m wide. Same with hallways. It's much easier to move around as a player (there is space to move for the camera), and you really don't notice the difference.
Faces
As I explained earlier, a mesh is an object which has several polygons. There's more to it, you can flip the mesh's faces around. Imagine that you have a box; a face is one side of it, like the top or bottom etc. Flipping faces means that the face ..err. faces in the opposite direction. In Max-fx the faces can only face into one direction.When we normally create a box, its faces point inwards, on the other side there are none, so you see right through it in the editor. When you have created your box, it'll look funny (and glow red, don't mind that). It'll look like a normal room if you go inside it. Now inside this room your player will act and do stuff.
(note: If you understand how 3d works etc, you should have no problem understanding all this. But if you have knowledge and still think this is complex, i've done something wrong, please mail me, so i can make this more clarifying.)
Extrude (manipulating the polygon)
We won't do anything fancy, just raise the roof a bit, so, choose F4 -mode and point at the roof, and press LMB and move your mouse upwards. The roof should now move higher, with RMB you can skew the roof. You'll notice that one edge of the polygon is always red, that's the "anchor" edge, it's always the closest edge to the cursor. When you skew, that edge stays put, and rest moves.If you want to have a wacky roof, you should try to skew it. You understand it best when trying it out, so point at the roof and close to the edge you want to stay put. And then hold down RMB and move the mouse. See? That's skewing. You can do the same operation to any polygon. So if you want, you can skew the room wall if you want, or make it longer. Anything is possible. But now, let's jump to texturing. *Hop*
Texturing
Basics
Alright, you've done a room, si? Now, move into the room and press F6, now were going to throw some simple texturing. If you've followed my instructions literally, you don't yet have any textures loaded. Lets get the textures from the examplelevel; find the text "Materials" from the top menu and choose it, and then click "Insert materials from file.." then find the examplemod.lvl from the examples-dir and choose it. Now, you see on the left pane the textures chosen. Most probably the red AI-texture. You can get all textures from LVL-files (only those) by this way. It's very useful. You should make yourself basic texturepacks in lvl-format, then you can load those always this way.
Remember that all textures you've loaded into the level will be exported with it, even the ones which are not even used. So before doing a final release, check that you don't have any unused textures lying around.
Categories
You might have noticed the small dropdown-menu on the left pane which lists odd things like ai_node_collision_nodraw, cardboard et cetera. Well, those are categories, which divides textures into different sections. Not only does it neatly make all those textures easier to manage, but it also defines how the texture behaves in the level. Ie, if you shoot a couch-texture, it'll let out different debris, make a different decal and even a different sound, than shooting on a tile-category texture. So you should categorize your textures accordingly.There are many categories, and you can add/remove them from the "Materials" -menu. Try them out and experiment.
Starting texturing
Alright, let's start, choose the category "Default". That's the basic category which has a quite common behaviour, in other words it throws some generic debris and does generic bulletholes (decals). You should use this category for most walls (like beton and brick) and roofs. Unless they are clearly another category (like wood or tile). So, let's texture the roof, move into a position into the room so that you see the roof-polygon and then just choose the grey texture from the left, make sure that you are in F6-mode (you need to move in Move-mode, space). If you haven't already, change to texturemode too, by pressing F2. And then just LMB click the polygon. Here's a picture to clarify it out: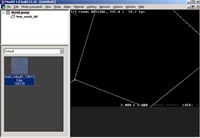
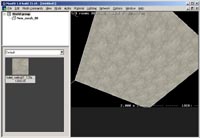
See? Easy as stealing candy from quake-players. Repeat the procedure with walls and the floor. You should understand how it works, remember to choose appropriate categories and textures. Your textures might seem a bit out-of-place, so we need to scale and perhaps rotate a bit. It's easy, just face the polygon you want to edit, and go into F6-mode. Now, when you point the texture and hold down the RMB, you can move the texture on the surface, just the textures move. Try it out. And if you want to change the size of it, hold also down TAB-key and press RMB again and move the mouse. Then the size of the texture changes too. Here also, like in extrude-mode, matters where the anchor-point is. It's the same idea, the edge which is yellow (rest are white) is your anchor point, and if you press down the TAB & RMB, the texture will hold it's edge there. You understand it when you see it, so keep on experimenting. You don't have anything to lose. You can rotate the texture with pageup/pagedown -keys.
When you are happy with one kind of texture on one polygon, and have other polygons around it who needs the same stuff, you don't need to do that all again. Just point at the well textured polygon (in F6-mode) and press C, then point at the texture where you want to copy the mapping and press LMB. It should now copy the mapping info there. Learn to use texture copy, it helps you a lot.
Alphas & Lightmaps
Inserting alpha textures is pretty easy. If you already have a done pcx-file as an alpha texture, just RMB-click on the texture at the left texture-pane and choose "Add Alpha Layer..." then it pops up a File-menu where you choose the alpha texture you want to insert. That's it.Now making alpha textures is a bit harder, you need a proper image-manipulation tool, like Photoshop or Paintshop Pro (there's a shareware-version of Paintshop at http://www.jasc.com/product.asp?pf%5Fid=001). I won't go into specifics, but the alpha-file needs to be a PCX-file with 256 colors, and also it needs to be greyscale. White zones let thru more light than black ones. If it doesn't work, try panicking, and then check that pcx-file really has indexed 256 colors.
We are ready to move in to combining rooms and making exits.
Exits & Connecting Rooms
Preparation
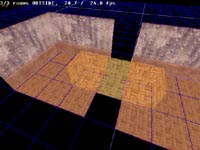
First, i'd like to point out that levels do work without exits. You just have group manually all objects with the room etc. Anyhow, I see no sense in making a level without exits. In my opinion, when you start a level, the first thing you do, is to make all the basic geometry and exits. It's good, because then you wont run into any problems later with exits. After you've basically done the whole level geometry, start making those details/lights/textures.Anyhow, things start to get a bit trickier now, but worry not, it's easy when you know how to do it. I'll start explaining after we've created another room, so, do one now. Just make it beside the other room like one grid-tick away. Like this:
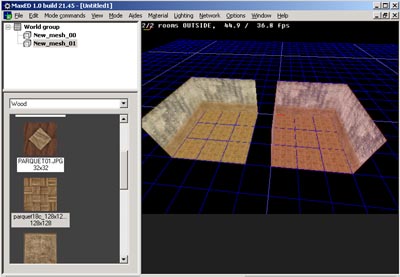
Now, draw a hallway which overlaps a bit into both rooms. It should be at least 1.5m wide. Looks like this:
Now, we want to connect all those into one single mesh. So, go into F5-mode and choose the other room by LMB-click and press U. Then just point at the hallway and LMB-click it. It should bring up a menu, and by default, the Union-choice should be selected. That's what you want to do, so click OK. Union does what it says, it makes two into one. Now the other room and the hallway became one bigger mesh. We want to have this other room in this too, so click the other room in F5-mode and Union it with the bigger mesh. Now it's all one big happy mesh.
The hallway should also look "sane", so it really is a gap between those two rooms. You can still, if you wish, extrude the gap, make it larger and change the shape (in F4-mode, of course).
Making the Exit
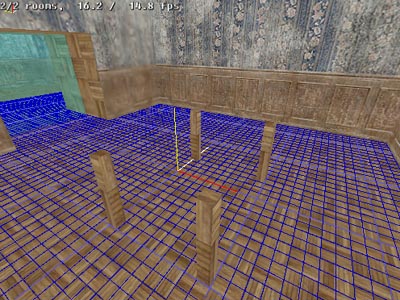
Now, lets do an exit between those two rooms. The exit then divides the level into two sections: Room 1 and Room 2. So, let's get to work. Float into the another room and face the wall where the hallway is and go into F4-mode, point the wall and press A. This should bring the grid against the wall. We need the grid so we can draw the exit-plane in the hallway. It all should look like this: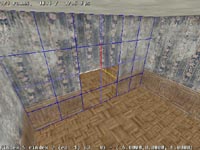
It's like that? Good. Now go into grid-mode (F12) and press pagedown, the grid should move into the hallway. If it goes to the opposite direction, press pageup. With pageup and pagedown generally, you can move things up/down relative to the grid. So if the the grid is vertically aligned (like now), the up/down means horizontal movement. Anyhow, back to the subject, move into view where you can see the whole hallway's polygons completely and the grid. Like this:

Then press F7 to go into exit-mode and draw using the grid edges as
points a plane that looks like this: 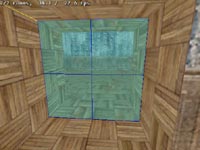
You draw the exit like any room, so the last and the first vertex connects when you press RMB. When you are done, it should say something like "Mesh is separated into two by exits". This means that you have succeeded.
When you draw and the line turns red (instead of white) or it makes an error sound when you press LMB at a new vertex point, you are doing something wrong. Try to place the cursor more accurately at the grid location. Usually there should be no problems if you've placed the grid well.
Now, if you succeeded (damn you if you didn't), you should have two rooms and they are separated by an exit. This is the very basic stuff of editing MaxPayne-levels. Remember that you always need an exit, because without exits, there cannot exist any "rooms".
Entities
Of course you need to make some entities before you can play your level. So let's first place a jumppoint. A jumppoint is the spot where the player spawns at the beginning of the level. You'll do it simply by going into F3-mode, pointing at the spot where you want the object and press N. It'll pop up a dialog with a dropdown-menu, and there's some choices. They are:- waypoint
- Use this for controlling enemies
- jumppoint
- The player startpoint
- player collide trigger
- When player "collides" (walks over it) with this, you can activate a message
- character collide trigger
- Same as above, but works on enemies
- projectile collide trigger
- A trigger that is enabled when the defined object is hit by a bullet
- action button trigger
- activates when player is close and does an action
- look-at trigger
- well it activates when player "sees" it (useful in starting cutscenes)
- floating FSM
- Very handy gizmo which you use mainly in effects
- pointlight
- Lights up dynamic objects
I believe all of those are quite self-explanatory, so i won't explain any further. If something is unclear, test it yourself.
Part 3: Manipulating the Mesh
So you're a maxed-god now and can do rooms, eh? Well, you might want to learn how to actually make some content in those rooms, like doors, tables, chairs or whatever. Your basic tool in creating the stuff is once again the Draw Mode (F3). And don't forget the grid, because the Grid is your best friend. Everything you ever do, you do it by the grid.
The Grid
So, the first thing to know, when you are doing the mesh, is to adjust the grid well. Let's imagine that you have a room (shouldn't be hard) and you want to have a table there. It'd be smart if you align the grid with the floor (go F4, point the floor and press A). But that's not enough, we want the grid to also align with the walls, so that the grid kind of divides the floor into equal sized pieces. Like this: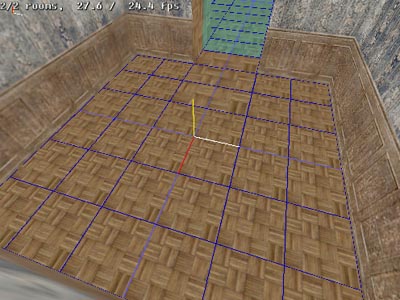
Now, usually you manipulate the grid in F12-mode, there you can move it around horizontally by holding down the LMB and moving the mouse around, if you want to move it vertically. Press pageup, if you want to lower it, press pagedown. You can change the grid facing by pressing 1, 2 and 3. And if you need some accurate moving, use the arrowkeys. You have to also change the grid scale quite often, you do that by keys NumPad+ and NumPad-.
Try those all out. When you are ready, place the grid like in the picture above.
Creating a table
Let's do a table. We'll build all the parts independently and then union them all together. Let's start from the bottom (that would be the table legs).It's smart to draw all legs directly where they should be placed in the final phase, and here we need the grid. First you should look roughly in large gridscale of how big the table is, then you just make the grid thicker and start making individual parts, and in the right places following the grids locations. Make the grid as thick so that one grid "square" is width & length of the table leg, and then simply draw it in F3 -mode, raise the top-polygon higher in F4-mode until it seems as a table leg. Remember when i talked about the faces? Well, now we need to invert them because now they are facing inwards in these legs! Well, it's simple, just go in F4-mode and point the leg and press Ctrl-F. There you are, faces inverted. Now it seems like a real object.
All objects needs to be grouped with the room they are in. What's grouping? Well, all things in MaxEd-levels has a parent, and a parent has a child. If you have a room, it's a parent, and all things in the room should be it's children. It's quite simple really. You simply place the object you want to be parented by the room, in the room, and than just go F5 and choose the room and press E. It autogroups all objects in the selected room with the room. Ctrl-E autogroups every object in the level with the rooms they are currently in. And now i'm not talking about rooms, but "rooms". I mean those separated (with the exit) sections in the level.
So, just go F5 and choose the room you are building the table into, and press E. The red glow should turn into green, which means that the groupings are ok. Do all the four legs, it all should look like this:
Notice how the legs should be aligned with the grid, and they are the same size as one grid square. Now also when you define the height of those legs, you should have the grid size the same as when you created those legs. Because extrude's polygon manipulating follows the grid ticks also.
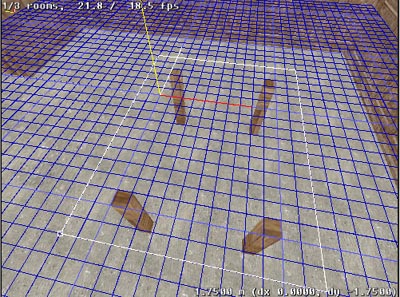
Now, let's do the table-panel itself, this will be easy, because we have the grid. Just go into grid-mode (F12) and press pageup until the grid is at the same level as the tops of those legs. Make sure that all legs are equally at the same height. Now it's the time to do last adjustments into height overall. Do that, and then we'll draw the table.
Now, the grid is at the level of the tops of those legs? Good, lets make the table-panel four grid units longer than the distance between legs, that'd mean two grid units "over" the leg at each corner. Like this (i changed the floor texture so you can see the legs better):
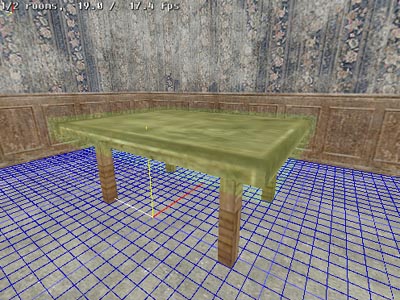
That's it. Now complete the textures and group them with union. Union it by first choosing one leg in F5-mode, press U and then LMB-click on the table, repeat with every leg. When you're done, we have a done a table. It should look something like this (if you have never seen a table):
Rotating
Now when you have united it into solid object. We may try to rotate it a bit. It's fairly simple, just go into F5-mode and then choose the table-object, and point at the vertex you want to act as a "anchor". That means the usual stuff, if you've forgotten already, it's the vertex that stays still, while the rest of the object moves. Now when you are pointing at the anchor-vertex just hold down button 2 (two) and move the mouse, you'll see that the table rotates. You can try other dimensions too, that'd be buttons 1 and 3. If you think it's easier, you can also use buttons X, Y or Z. That kind of movement applies to all objects.
"Carving"
Carving, which is called subtracting/intersecting in MaxEd is a familiar thing to all level designers. Basically you'll use subtracting.Subtracting is a simple thing, but hard to explain. It's those "you have to see it yourself"/"There is no spoon" -things. But i'll try. In subtracting you want to take a part away from a object. Like making the waterhole in a toilet. You should create a new object which is shaped as the gap you want to make in the original object. When you are done, you move the newly created shape in the original object and after that you choose the new object (in f5-mode of course) and press U, then you LMB-click on the object where you want to take that part away. The familiar menu appears, but this time you don't choose union, but Subtract. Press ok, and the new object disappears and leaves a gap in the original object. That's subtracting. You should try it yourself and experiment so you understand.
Polygroups & Smoothing
If you want to make the mesh seem "smoother", there is an option: Geometry & lightmap smoothing. But first, you need to make the mesh a polygroup. First go to F5-mode and choose the mesh, and then look it up on the left top hierarchy-list. RMB-click it, and choose "Add Polygroup". It'll ask if you want to add all polygons in the mesh to the group. Usually you don't want that, because you should only smooth the polygons that really need smoothing, like surfaces which are meant to be curvy.So answer no, unless it's a special case (a sphere, for instance) and then go into F6-mode. Now, you should click the polygroup, which is now a children of the mesh, on the hierarchy-list. Then shift-LMB-click on the polygons you want to join in the polygroup. Choose only polys that need it. So if you have a cylinder, only the sides need smoothing, not the top or insides (unless you see it).
Now RMB-click the polygroup in the hierarchy-list and you can toggle geometry and lightmap smoothing there. You can see geometry smoothing only in the game itself. Lightmap smoothing can be seen after you've done a normal radiosity calculation (not preview).
Part 5: Lighting
Basically there are two kind of lights: Polygon lights and Pointlights. You need both in a level. To put it simple, polygon lights affects only level textures, nothing else, and pointlights affects all dynamic objects, nothing else. Rest are just variations of those.Polygon lights
All polygons emit light, but the color varies. Black would mean that you don't see the light, so your basic texture emits light, but it's black (inexistent). In practice, all you have to know, is that black == no lightie, white == bright lightie.So.
If you want a light in the ceiling, you have to make an object and set one polygon of it emitting white light. There's a shortcut for it, and it's Shift-L. So, go into F6-mode, point the polygon you want to light up the room and press Shift-L. The texture should become much brighter. And, that's basically it, just do a preview-radiositycalc and you'll see how the light affects the textures.
If you want to do it manually, you go F6, point the polygon and press L. A dialog pops up and there you can define the light color yourself.
If you have set the light color to white and it's not enough, you have three options:
- Raise the intensity - press I on the polygon while in F6-mode, it can be anything between 0-99. Don't mind the text which says 0-1.0
- Change texture - the texture which emits light might be too dark. Yes, the texture affects this too, you should use basic lamp-textures on lights
- Make the polygon larger or add another light
Spotlights
Spotlights light only dynamic objects, but are emitted from a polygon. The difference to pointlight is that it's directed and you can change certain attributes. I use these almost at every lightpolygon, because then you don't have to make a separate pointlight.
You make spotlights by first going into F5-mode and choosing the mesh which emits the lights and press return to open it's properties. Then click ON the option "Export lights". After that the lighting polygon(s) in that mesh acts as a spotlight. You can see spotlight properties by clicking MMB and choosing "spotlight properties" or from the "Mode Commands" -menu on the top.
All the options in spotlight properties are quite self-explanatory.
Pointlights
Well, there isn't much to tell about these. They are just placed entities which emit light at every direction only on dynamic objects like characters (including player) and DOs. You should always accompany a polygon light with a pointlight or use spotlights.
Calculating Radiosity
How it works
If you know what ray-tracing is, then it's simple, radiosity is basically the same stuff. I'm not sure how it's handled in Max-Fx, but basically it's the way of lighting that is probably the closest thing to real-life lighting. Light traverses in radiosity like in the real world and bounces off bright objects until it fades away. You may have noticed "passes" while calculating radiosity. That means how many times the light actually bounces off textures. Usually 3 passes is enough, or even two. If you are really hardcore and have the processing power, you might do it in 4 passes. All this can be defined in the preferences.(If you didn't know, the preferences are map-specific. The info are stored in the lvl, they really don't have anything to do with the editor itself. I don't know why it isn't, but it should be renamed to something like "Map Properties" or something.)
As you can imagine, calculating a life-like light which bounces from surfaces is very complicated and takes huge amounts of processing power. Usually you don't want to do a normal Radiosity Calculation, because it takes so long. There's a choice called preview-calculation which is much more useful in map-developing.
When you choose the radiosity calculation from the menu, it asks first if you want to do a preview-calculation, answer yes if you do. If you answer No, it'll do a normal calculation. And I can say, that normal radiosity-calculation on complicated levels takes ages. Don't use it unless you really need to.
I don't run the basic radiosity calculation at all, only when the level is ready and needs the last big computation. The preview-calculation is just as good and gives you a good hint of how the lighting works in the level and it is several times faster too.
Setting preferences
The preferences define your map specs, how the lighting is calculated and so on. You should set most values higher. Here's the basic preferences from the man himself, Marvel:
This is a modified textblob from the MaxED Reference:
- Back clip plane - Distance of textured display mode back clipping plane
- Front clip plane - Distance of textured display mode front clipping plane
- Exit acceleration - Use exits to accelerate drawing in textured mode
- Render to window - Render textured view to the document window, if 3D hardware supports windowed rendering
- Kbd tilt angle - Number of degrees LC and RC tilt polygons in F4 mode
- Select culled polygons - See "Mode menu"
- Clear render screen on F2 switch - Redundant
- Flip faces after mesh creation - When set, the polygons of any object created in F3 will be flipped
- Save/load triangle data - When set, triangulation information is stored in the LVL file. Strongly recommended to keep this on.
- Vertex ticks - Draw small boxes around vertices in wireframe mode
- Apply Paste displacement - When set, pasting objects (Ctrl-V) in F5 mode will apply a small offset to each object pasted. Try copying an object and pasting it multiple times in F5 mode.
- Average lightmap borders - When set, an averaging scheme to calculate lighting for light map texels outside is used. Otherwise the calculation is more accurate, but takes more time.
- New grid units - Switch between old and new grid units
- Hide other objects (selrend) - When set, and rendering radiosity for the selection, objects not selected will be hidden
- Use exits in radiosity calc - When set, the radiosity calculator will use exits to optimize performance
- Texture display - See section "Mode independent", subsection "Num /"
- Display exits - See section "View menu"
- Display keypoints - See section "View menu"
- Display non-visible rooms' BBs - When set, the rooms not seen through an exit sequence are rendered as translucent gray bounding boxes. Only has effect if "Exit acceleration" is set.
- Display statistics - Display engine statistics. Only has effect in textured mode when "Exit acceleration" is set.
- Radiosity viewport size - Controls the hemicube size for radiosity calculation. Bigger sizes give better results, but result in longer rendering times.
- Radiosity passes - Set number of reflections traced by the radiosity solver. 1 means direct illumination only.
- Radiosity boost - General "Intensity" for direct illumination
- Radiosity backplane - Backplane distance for radiosity solver
- Connected rooms - Number of rooms to keep active when the camera is outside all rooms. Only has effect if "Exit acceleration" is set.
- Global lightmap res - Light map resolution scale for local machine lighting
- UV scale m/UVU - Redundant
- Angle snap - Granularity for rotating textures in F6 mode. Value in degrees. Value 1 means granularities are not enforced.
- Texture increment - Number of UV units (texture lengths) to move when translating textures by the arrow keys in F6 mode. Redundant, texture movement is one grid unit.
- Lightmap res txl/m - Default light map resolution for new objects
- Set default light - Specify Default light color, which can be applied by Shift-L in F6 mode
How to place lights
Really not sure if there's need to dedicate a whole chapter for this. Placing lights is simple: Just place them as you would in real life. If you have a room, and it needs lights, just do a lamp-object on the roof and make a polygon on it emit light. Here's an example:(picture coming soon)
The only exception is when doing a sunny outside place, because you cant make the skybox emit light. So, you need to make all streets and stuff do the trick.
Triggers & Finite State Machines (FSM) & Messaging
(note: I read the official fsm-tutorial later, and it's better (imo), you should give it a read at http://www.maxpayne.com/tutorials/MaxED/dynamic_objects.htm) FSM in itself does nothing. It's meant to act as a effect-starter, noisemaker and such. Let's imagine that you have an air-vent and you want it to blow steam and make some surreal fuzzy noise. First you need to place the FSM, you should use the grid. So go in F4, point the polygon where the vent is and press A, so the grid aligns with it, then just scale the grid and go F3 and place it in the middle of the polygon by pressing N and choosing Floating FSM. Next group it with the room by pressing F5 and choosing the room by clicking it and then pressing E (or just ctrl-e to autogroup everything with their rooms, it's just slower on larger levels).Now we'll tell the floating FSM what to do. Go F5 and choose the FFSM and press 4, which opens the FSM properties. Then just choose messages from the bottom right corner. That opens the message handler-dialog, where you can add messages to certain events. Different events are usually like "Startup" or "T_Activate" and so on, they are on different tabs on the top part of the dialog. In a basic floating FSM there's just startup. That means that when the fsm starts (in other words: when the level starts), it will instantly run all defined messages.
You can adjust "when" the message is done by placing them on different textboxes. As you can see, there are three textboxes labeled "Send before", "State specific" and "Send after".
We want the effects start at the same time the level starts, so we'll just throw our messages in the "Send before" -part by pressing the Add -button next to it. It should open a simple dialog where you need to type the message. Write this:
--i'm writing more later--
--Mikael Kasurinen aka mixuk
note: if you want to comment this article, you can mail me.